The cockpit was something that I wanted to improve on this build as compared to the ESK 12 which has a large open cockpit with a sharp pointed front end. This shape is very simple and can be easily fitted using formed half section shapes. It is not a good fit for a standard spray deck and so lets in water.
An Oval cockpit is rather more difficult to construct but provides for the use of a standard neoprene spray deck that can be purchased from any kayak shop. I used an XL size keyhole spray deck, then worked out the circumference plus the elastic stretch and then made a CAD drawing of the shape after checking dimensions to ensure I could fit through the hole!
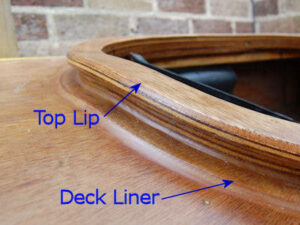
This shows the finished cockpit with the coaming ring that takes the spray deck over the top lip.
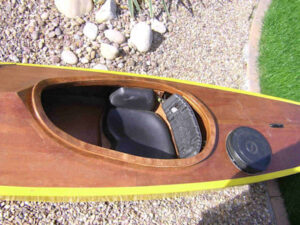
Note the triangular transition piece at the front of the coaming to match the pointed deck to the oval profile of the cockpit.
I also fitted a playboat back rest and foam seat with hip pads to give greater comfort during longer journeys.
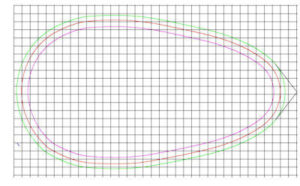
This was my original drawing (below) with the red rings showing the internal size and the green ring showing the outer size for the top lip. Also shown is the small triangular infill needed to blend the apex of the deck section with the radius on the coaming and allow space for the spray deck to be fitted over the lip.the The drawing was plotted full size so that I could use this as a template for the plywood shapes. The grid is drawn in 25mm squares so that gives an idea of size.
This picture shows the layout of the plywood rings.
The stack is laminated from scrap pieces of the 3.6mm plywood that were left over from building the hull. To reduce waste, only the Top Lip and the Deck Liner were cut as complete sections. All the other segments were made from the spare middle cut out sections plus any other scrap ply.The laminations were cut after using the full size drawing to mark them out. This allowed me to position the various cuts to make up full rings. Everything was left oversize for later trimming down.
After gluing down the the triangular front piece and the deck liner, I laid a sheet polythene over the top of these sections so that the glue would not allow them to adhere to the surfaces.
Plenty of glue and clamps were then used to force the plywood to conform to the deck shape this requires some patience because everything is sliding on the glue and so several re-clamping sessions were needed before I managed to align everything correctly.
Once the glue had set, the clamps could be removed and the coaming lifted away from the boat. All surfaces were cleaned and smoothed using a spoke-shave, file and sandpaper until the final shape was achieved.
The deck liner was roughened to give a key and then the coaming was glued and clamped into place. I drilled and screwed a number of Stainless Steel countersunk screws up from under the deck to secure the ring and prevent it moving once in place. It was important that the screws were of a length that would secure as many ring segments as possible but not break through the top surface.
The final job was to fillet the seams around the deck liner and also the bottom ring primarily to ensure a good seal but also to make a better finish.