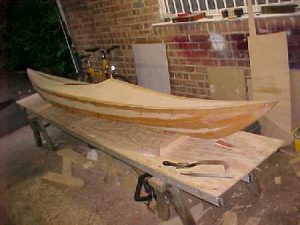
After finishing the taping of the external hull seams, the final stage was the making and fitting of the deck. This caused me a few problems. I cut the deck to the given sizes on the plan only to find that the pieces did not fit correctly and I was left with some rather large gaps at the widest part of the deck! It occurred to me afterwards that the sensible idea is to make a paper pattern of the hull shape and take the deck shape from this pattern. I think the plans give an approximate shape but as every boat will be slightly different, then the finished hull needs checking to make a good fit.
Here is the deck (below), finally fitted and taped. I wired the bow sections together on the outside along the top “vee” then ran the fillet underneath with the deck held loosely in place. After the Resin had hardened, I carefully removed the assembly, before cleaning everything then making the final fixing using ring nails and glue. An external tape strip finished the deck to hull joint.
Once the deck was fixed and taped, the cockpit coaming ring was made in 2 half sections. The lipped shape to take a spray deck was made from a stack of five 3mm ply pieces finishing with 2 wider sections as top rings. I clamped these together on to the deck whilst the glue was setting but put a piece of polythene between the deck and the strips. Once set, I could remove glued the cockpit sections and finally trim and smooth them before fixing to the deck. The plans give a guide to the shape needed for a spray deck. If an open cockpit is preferred then the edges can be finished with a flat strip coaming bent around the frame.
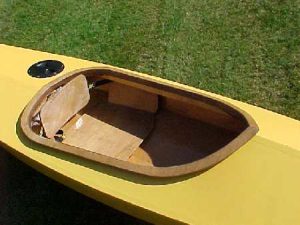
Here is a closer view of my adjustable backrest and seat base that can be seen in the previous picture. The seat pan is screwed into the boat before the sides are taped into position. The backrest has a couple of stainless steel clips holding a kayak securing strap threaded through the back. Note the “RWO” standard hatch on the rear deck, just the right size for stowing flask and sandwiches on a day trip! This was fixed after painting the hull had been completed.
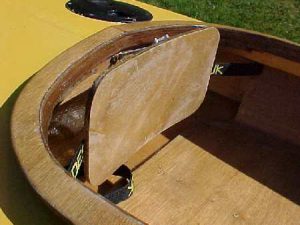
Here you can see the large brackets I secured beneath the deck to take thread the straps and take the weight of leaning on the back rest. Although setting it up is a bit difficult, the rest works very well and has proved comfortable.
After fixing these items, the final part of the job was to sand the whole hull smooth. It was necessary to wash the resin to remove the “bloom” that forms after about 24 hours. Paint will not stick to this and it must be removed. Sanding with wet and dry paper then washing off has a similar effect. After this, I used an electric sander to go over the whole hull to smooth and prepare the surface for painting.
I finished the outside of the hull with marine primer and good quality exterior paint, and the inside with resin covered with varnish. With hindsight, I think I should have bought better quality paint because the kayak takes a lot of rough handling and after 12 months, much of the paint was scraped off in vulnerable areas.